Thursday, March 31, 2011

Infinity dress, easy peasy


 I originally found the infinity/convertible/multiway dress in a catalog, it advertised wearing it ten ways, and I wanted it!!!  Unfortunately it had sold out. I was gutted. So I tried to find one on the internet. I found even better: I came across http://www.rostitchery.com/infinity-dress.html. Rostitchery teaches you how to make one of these, and it only has one seam, how easy is that!! She has fabulous, easy to understand instructions, so I went for it. It only took a couple of hours to make, and I didn't have to use a pattern, and then ta da!! My very own infinity dress!!! There are dozens of ways to wear it. Here are three of mine.

To do this version, you just twist the sleeves.
to do this version, leave the sleeves halfway

to do this version, just pull the sleeves down

This dress is neat, I love how it drapes beautifully. It is really versatile. You can wear as a sleeve or non sleeve dress, a skirt, or a halter or one sleeved dress. You can also put the tie at the front or back, and there are lots of neat ways to tie the sleeves to create interesting detail.

This dress is made from a two way stretch fabric. The beauty of this fabris is you don't have to finish the edges as it won't fray. Unfortunately that does also mean it is neccessary to have a steday hand in cutting.

I am wearing my new metal rose necklace that looks really vintage, and my favourite blue shoes.

this is from the rostitchery tutorial site I mentioned above. Look how neat she made the back look.                                                                                            

http://jammiedodger77.blogspot.com


from daveandcharlotte.com


Those are a few of my favourite infinity dress images, these images got me inspired to make it :) Inb fact after learning how easy it was to make, I made another, which I will show you soon...

Tuesday, March 29, 2011

The lazy circle skirt, 2 more ways


 Today I will show you two final ways to wear your easy new lazy circle skirt I showed you how to make. The 'funky casual' look, and the 'work' outfit.

Style 3: The 'funky casual' look

To get this look, I wore a navy and white polka dor blouse, a slim blue belt I just bought from an opportunity shop, my pearls, and vivid blue heels.


 Which colours do you think go best with bright yellow? I like blue, white and black. Which colours would you choose?

 The final look.

Style four : the 'work' look

To get this look i wore a white wrap shirt and sensible black heels.
I had to roll the waist band a couple of times as otherwise it looked a bit frumpy.

Now I am not sure where you work, but unless it is somewhere quite creative, perhaps a more subtle colour would be appropriate for work.

I only made mine from bright yellow as it was 1) on sale for three dollars a metre, 2). I love, love, love yellow and 3) this fabric is a two way stretch, so appropriate for this project, and it had a beautiful drape.


 Whilst researching colours that go with yellow, I found these images I love and thought I would share:


from fashionising.com


I love this look with the fitted knit top and the cute wee scarf.


Chambray/denim also looks great with yellow, and this last image is a great idea when thinking about dressing funky in cooler weather
From J. Crew     


from frmheadtotoe.com

Monday, March 28, 2011

lazy circle skirt styling


I want to show you how easy to wear your lazy circle skirt is. In fact it doubles as a dress. I will show you four looks in total. Today I will show 'the party frock' and 'the lunch with the girls frock'

 Look one: the party frock

 To get this look : wear fun heels, a belt to cinch in the waist and a scarf or necklace.

Isn't my little sister stylish?, she taught me how to wear a skirt as a dress.
 this dress is great fun for dancing in, it has a lot of movement :)
swishy fun times


 Look two: the lunch with the girls frock


To get this look: wear a black cardigan, a coordinated belt to cinch in the waist, and fun heels again. Today I am wearing my grandma's brooch aswell. I love it, its is a sparkly griffin and looks really retro.


You will love the swish factor of this skirt, it makes you want to twirl and dance  :)


How would you accessorise your skirt?

See next time for 2 more ways to wear your lazy circle skirt :)

Lazy half hour circle skirt tutorial


This will take about half an hour to make once you have your ingredients list :)


This is a simple skirt to make. 
All you need:

INGREDIENTS

  • A piece of fabric the same length as the width of the selvedges (e.g. 1.4 m by 1.4m), if longer, that is ok. This tutorial is displayed to show you how to make an even square if your fabric is longer than wide. Note: it must be a two way stretch fabric for this simple skirt
  • Scissors
  • Sewing machine and thread
  • A piece of string
  • A piece of thick elastic, just longer than the circumference of your waist
  • Sewing pins
  • A thumb tack
  • Tailors chalk or a pen


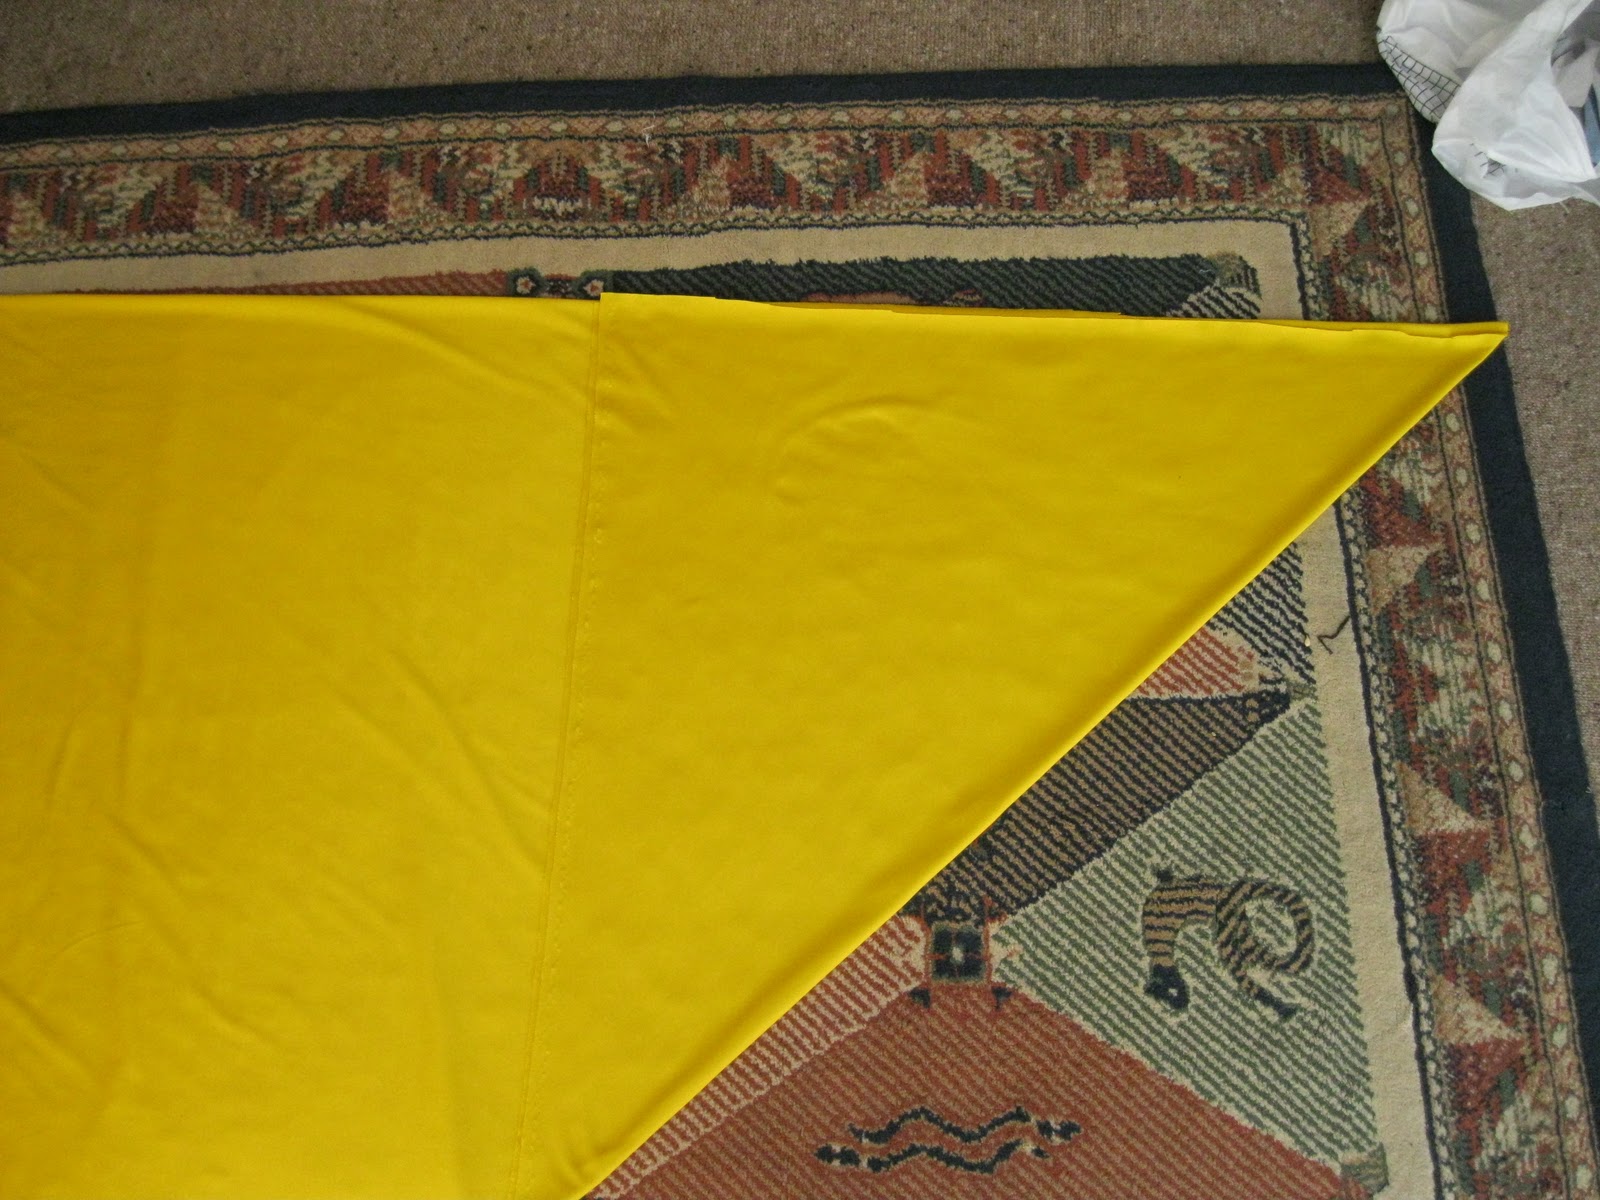
Step 1. making the big square. Fold your fabric in half, touching selvedge to selvedge


Step 2. Fold one corner up so it touches the selvedge
 Step 3. Fold this back on itself
 Step 4. Open this triangle out.
 Step 5. Cut down this line you have made (when opened out this makes a big square). If you had started with a big square, just fold this in to quarters now).
 Step 6. Making the curve. Get a piece of string, tie it to a pen or tailors chalk (if using a pen, make sure it does not mark through to the right side of your fabric). Tie it to a thumb tack. Push the thumb tack as close to the edge as you can-(where all the squares are joined, imagine if it was folded out, you are aiming to make a giant circle now). This step makes the skirts edge.
 Step 7. Draw an arc out around the raw edges. It will look like a quarter circle.
 Step 8. Cut this out, cutting through all layers evenly.
 Step 9. Do a smaller arc in the centre. Note: start tiny, you can always cut it bigger if it is too small, whereas if you cut it too big, you will have to gather it to make it fit the waistband later on.
 Step 10. Cut this out. Try it on and see if it fits your waist, It should fit here snugly. You can always cut it bigger if it is too small. Because it is stretchy fabric, it should fit over your hips.
 Step 11. Finish the skirt edge. I just overlocked it because I am lazy, but a hem would look nicer. This is what it will look like at this stage.
 Step 12. Put the elastic around your waist. Overlap it a little so you can sew it together

 Step 13. Sew the elastic to itself
 Step 14. Pin the elastic to the centre of the skirt, pinning right sides together, stretching so the elastic fits the fabric, or vice versa. If you made your skirt with a too large waist, it will mean there are small gathers along the fabric. This is fine, just spread the gathers evenly.

 Step 15. Sew the elastic to the skirt. Pull out the pins, turn it inside out, and ta da!! If you sewed it correctly, you should not see the seams of the elastic, you can always top stitch the skirt to the elastic if it puffs out from the elastic.
 It looks great when you walk or twirl because it is very swishy.
What do you think? Are the instructions easy enough? If you make one, please send me the photos and I can show the world your swishy skirt creation too :)

Over the next few days, I will show you how to wear your new creation :)

Wednesday, March 23, 2011

My first patternless dress and Lady Anne

Before I show you my dress I made, I want to introduce you to someone important. This is lady Anne of course. You might be able to guess why I named her this; like the infamous Anne Boleyn, neither has a head.  Also The Tudors is one of my favourite series :)

She is wearing my old swimsuit for modesty. 


Anne helped me out a lot with the construction of this dress. To make this dress, I sewed two pieces of fabric up the side and pinned to Anne until it fit her, then resewed the seams there. I made it a one shoulder dress too, then stuck a ruffle on top. I love ruffles.

I highly reccommend Anne as a model. She is very skilled in that she can stand still for a really long time, doesn't need to move to scratch, doesn't need coffee breaks, and you don't have to pay her double time and a day in lieu on a public holiday. In fact, she works for free!!! What a champion!


Front view

So today as my photographer (boyfriend) was away, I stood in as photographer, and Anne volunteered to model for me. She is wearing my new red boots and a matching belt from an op shop.

This fabric was from Spotlight, it was a dollar a metre. It is a cotton drill I think. It has the drill lines on the bias, has a nice heavy drape and is a bit stretchy. As it was so cheap I bought the rest of the roll. Then I had to try and smuggle it in to the house without the boy seeing. (I am not supposed to buy any more fabric as I have too much already, and when I make or buy something I am supposed to throw an item out as I also have too many clothes, so I have to be sneaky and crafty). I also bought plenty of length in a bright red and dark blue at the same time. I think it will be a great fabric for making winter dresses from.

Ruffle close up
 I didn't really know how to make a ruffle then, so I cut lots of rainbowish shapes and sewed them side by side. It worked well except it means you can see the seams. Oh well. I now know to make a ruffle, you cut a spiral shape.


back view
 As the dress had no darts, it was a little shapeless, so I cinched it in either side of the centre back and put some stitches in to hold it together. When I don't wear a belt, I will wear a brooch there as I like how it looks all radiating out.

My boyfriend came home, so he kindly took a picture for me. I am wearing a dark purple belt from an op shop and my favourite brown boots.

Monday, March 21, 2011

Fifties style

 To start with, this is not a sewing post,sorry, it is a fashion one. In the last few months I have started to love fourties-fifties style things. I love the cinched waists. The style is so flattering. I love the red lips, nails and wearing pearls and how the look is so put together. They all looked so ladylike. Unfortunately I can't dress like this every day, there is no point in doing my hair when I have to cover it in a hat at work. But I can break it all out in the weekend, yeehah!! All of the clothes in this post were bought new, but usually when I do my fifties look, I would wear a full skirt I bought in an opportunity shop. Op shops are also a great place to get cheap belts, and hand bags for this look. To complete the look you need a fitted top and a belt to define the waist, a skirt, preferably full, and then you just need pearls, red lipstick, winged eyes and cute kitten heels( I know I am wearing boots, but it is getting cold). Oh of course, and the best accessory, a handsome man to hold your handbag, thanks D.

 
 Nail polish normally lasts half an hour before I pick it off, but this stuff lasts for days, awesome.


 This is my friend L, we went to dinner at La Porchetta for dinner (the boys were too embarrassed to be in the photo), La Porchetta have the best wedges ever. I had just learnt how to do victory rolls in my hair a couple of nights before; victory rolls are the glamorous hair do that all the girls have in the movies when the second world war is over (and  fourties pin up girls). I popped a bow on top, to go with my belt, nails and lips. I am still learning how to do liquid eye liner well. Ooh and I got a big complement from my boyfriend in a roundabout way. He hates my fifties look and asked when I was going to jump back in the time machine. That just tells me I achieved the look I was going for well, so I was happy :)


A better close up of the rolls

new ruffle skirts

 This is New Look 6897. I reccommend this pattern as the instructions were easy, the skirts were fast to make-a few hours each all up, and they fit really well. I made the bottom left view.

 You know I love ruffles. I had the plain red left over from my 'cooler than the red dress' project. And I found the check red on sale ages ago, it was an offcut of only a metre or so, so not enough to make a dress from. I am the type of person that buys patterns when I love them (and on sale) and I buy fabric on sale, and always buy 3 metres, so it is enough to make a dress from. Then one day six months later or so, I match the two together when I am in the mood. It often means I have leftovers from dresses, which is fabulous as I can use bits and pieces to make a skirt.
I love that this dress is made from different panels. I have meant to do this for ages, using a couple of different colours in an item. It is also nice to wear red and black to show pride in my community as those are my regions colours, and people have been amazing to each other during this earthquake business, really helping strangers and friends alike. I feel really proud to live in Christchurch, people here are amazing.


 Bum view :)

                                                          Skirt 2 

 After I loved the first skirt so much and it was so quick and easy to make, I made another skirt straightaway. Sewing is the joyous outcome of being a shift worker and sometimes having days off during the week. There is no one to distract me or hang out with, so I can be creative instead. And after these earthquakes we can't swim at the beach and my gym is still closed due to damage, so sewing is something I can still do when other normal entertainment is not available.

 I know I could have made a different view for the second skirt, but this ruffle was awesome, so I wanted another. Again the red is a leftover from 'cooler than the red dress' new look 6699. And the blue is also a leftover from another new look 6699 dress. I had thought about putting navy in the dress instead of red, but I didn't have any pieces of the right navy in a big enough quantity. And it turns out I like the contrast of the red and navy anyway :)