This will take about half an hour to make once you have your ingredients list :)
This is a simple skirt to make.
All you need:
INGREDIENTS
- A piece of fabric the same length as the width of the selvedges (e.g. 1.4 m by 1.4m), if longer, that is ok. This tutorial is displayed to show you how to make an even square if your fabric is longer than wide. Note: it must be a two way stretch fabric for this simple skirt
- Scissors
- Sewing machine and thread
- A piece of string
- A piece of thick elastic, just longer than the circumference of your waist
- Sewing pins
- A thumb tack
- Tailors chalk or a pen
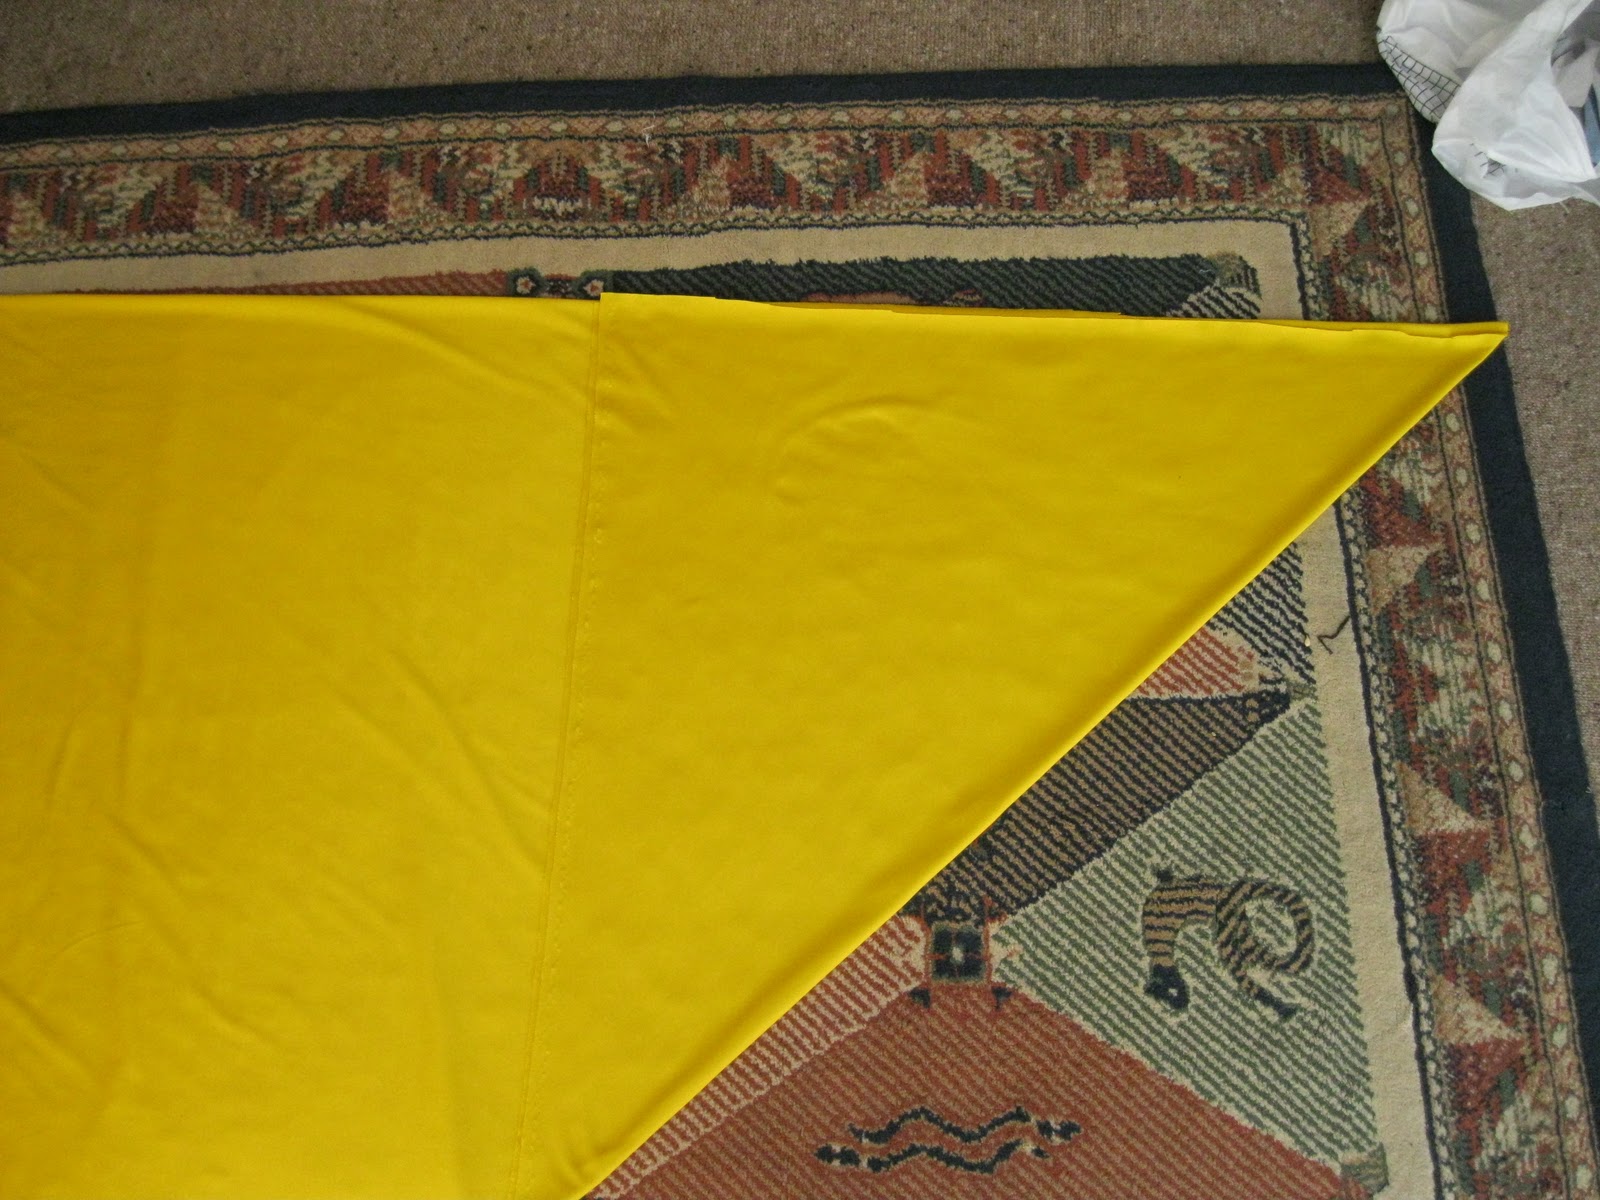
Step 1. making the big square. Fold your fabric in half, touching selvedge to selvedge
Step 2. Fold one corner up so it touches the selvedge
Step 3. Fold this back on itself
Step 4. Open this triangle out.
Step 5. Cut down this line you have made (when opened out this makes a big square). If you had started with a big square, just fold this in to quarters now).
Step 6. Making the curve. Get a piece of string, tie it to a pen or tailors chalk (if using a pen, make sure it does not mark through to the right side of your fabric). Tie it to a thumb tack. Push the thumb tack as close to the edge as you can-(where all the squares are joined, imagine if it was folded out, you are aiming to make a giant circle now). This step makes the skirts edge.
Step 7. Draw an arc out around the raw edges. It will look like a quarter circle.
Step 8. Cut this out, cutting through all layers evenly.
Step 9. Do a smaller arc in the centre. Note: start tiny, you can always cut it bigger if it is too small, whereas if you cut it too big, you will have to gather it to make it fit the waistband later on.
Step 10. Cut this out. Try it on and see if it fits your waist, It should fit here snugly. You can always cut it bigger if it is too small. Because it is stretchy fabric, it should fit over your hips.
Step 11. Finish the skirt edge. I just overlocked it because I am lazy, but a hem would look nicer. This is what it will look like at this stage.
Step 12. Put the elastic around your waist. Overlap it a little so you can sew it together
Step 13. Sew the elastic to itself
Step 14. Pin the elastic to the centre of the skirt, pinning right sides together, stretching so the elastic fits the fabric, or vice versa. If you made your skirt with a too large waist, it will mean there are small gathers along the fabric. This is fine, just spread the gathers evenly.
Step 15. Sew the elastic to the skirt. Pull out the pins, turn it inside out, and ta da!! If you sewed it correctly, you should not see the seams of the elastic, you can always top stitch the skirt to the elastic if it puffs out from the elastic.
It looks great when you walk or twirl because it is very swishy.
What do you think? Are the instructions easy enough? If you make one, please send me the photos and I can show the world your swishy skirt creation too :)
Over the next few days, I will show you how to wear your new creation :)


Thank you for this! I love these types of skirts and bought some material to try this but had no idea where to start. Now I do. Thanks again.
ReplyDeleteHey Deb,
ReplyDeleteyou are welcome, I hope the instructions are easy enough to understand, let me know if you get stuck, and I will try to help. I would love to see what you make when you are finished!! keep in touch :)
this is exactly the type of pattern I was looking for to make for my grand daughter. I had an image in my head but couldn't figure out how to do it and didn't want to mess up the piece of fabric by making the wrong cuts.
ReplyDeletethanks.
Hi Anonymous :)
ReplyDeletethank you for the comment, and you are welcome. I hope the skirt works for your granddaughter, I would love to see it. :)
what are the measurements when folded square that you are using?
ReplyDeleteHi Anonymous, it depends on the width of your fabric you pick. Most fabrics are about 110 cm or 140 cm, so when the square is folded, it will be half of that, e.g. 55cm by 55 cm, or 70cm by 70 cm. I personally would just make the square, and trim the edge later if it was too long. I guess you do need to measure from your chest to where you want the hem to fall if you want it to be a dress, not just a skirt, to make sure it is long enough. Or if it is for a child, measure from hem to where you want it to start, e.g. waist or chest and add on 2 seam allowances, and it will be a much smaller square you cut.
ReplyDeleteIf you meant my individual square, I never measured it, sorry. I used a stretch jersey and they all seem to have a long width, if that helps. Hope this made sense to you. Good luck :)
Once I can get my sewing machine to do the hems right I will send you my version. Thank you for the simple instructions.. :) - sabra
ReplyDeleteYou're a clever girl! Thanks for sharing your inspiration! Blessings from Christ! May your creativity be multipied!
ReplyDeleteWill this work for an ankle/calf length skirt?
ReplyDeleteYou'll need to use two pieces, as most widths of fabric won't support a full-length skirt (unless you're REALLY short). I'm 5'4" and need to do a two panel circle skirt.
DeleteBe prepared to break out with some geometry. Here are two tutorials I found to be very helpful:
http://www.madamexcostumes.com/newpages/ttcostumes.html
http://whatthecraft.com/circle-skirt-tutorial-new-and-improved/
I've never sewn the elastic directly on to the waist; seems like it could save time. What do you do to ensure the elastic is sewn on correctly? Thanks!
ReplyDelete